Third Function Valve Kit #380-152A

Jake1074

New member
Nov 14, 2017
6
0
0
Saluda, NC
I ordered a Third Function valve kit for my L3301. I am struggling with properly identifying the hydraulic hose that connects to power beyond point of the the tractor's loader valve assembly.

All the hoses have a color coded band on them but I'm just not sure which one it is.


Any help, guidance or actual pictures would be greatly appreciated.

Thanks in advance.
 

Jake1074

New member
Nov 14, 2017
6
0
0
Saluda, NC
That's a Land Pride number, have you tried their technical help number?

Pat
Yes - I called them and they referred me back to my dealer. Who is happy to install it, if I bring the tractor to him, but its 90 miles one way.

I'm sure someone in this forum has installed one and could point out the correct connection points.
 

kenmac1

New member

Equipment
MX5100 HST
Dec 22, 2017
1
0
0
Heart Of Dixie
Just had a 3rd function added to my MX 5100. It uses the same port as in the pic that Teg posted.

I hope you saved some $$. dealer charged me $1200.00 for a Kubota 3rd function installed
 

Jake1074

New member
Nov 14, 2017
6
0
0
Saluda, NC
Just had a 3rd function added to my MX 5100. It uses the same port as in the pic that Teg posted.

I hope you saved some $$. dealer charged me $1200.00 for a Kubota 3rd function installed
My dealer also quoted $1,200.00 to install after I had purchased the tractor and taken delivery. It was an end off year deal which to me the total package was a good price. However as a newbie I failed to ask for the third function valve at time of purchase, which I could have rolled into the 84 month finance. I also didn't notice that it had a pin on bucket - so now I have to go back for the QA. My dealer is 90 miles one way so add transportation cost and time to the budget.

I'm a pretty good mechanic but haven't done much hydraulic work. So I bought the kit from Messicks for $675.00 and now that I have the correct hydraulic connections will install it after the New Year. Looks like I will save enough doing it myself to pay for the QA.
 

Hook

Member

Equipment
L3240 with LA514 FEL, Box Blade, Howard Rotovator, All Purpose Plow, Sub Soiler
Jul 6, 2010
212
6
18
Jackson, Georgia
You can do it yourself. I recently added a third function to my L3240 and it looks like your install will be easier than mine was. My power beyond port was on the hydraulic valve under the tractor and connected to a port under the seat. I had to remove the seat to get it out. The kit came with a good set of directions which helped. I used the new grapple for the first time yesterday and it worked fine.
 

flyidaho

Active member

Equipment
L 3301 HST
Feb 28, 2017
410
183
43
IDAHO
I was unaware or the "third function valve kit", when I ordered my "double acting" hydraulic valve from Surplus Center http://www.surpluscenter.com/Hydrau...ool-8-GPM-Prince-MB11B5C1-DA-Valve-9-7861.axd

My thinking was (ignorance is bliss) I would just fab a mount for the new valve, to the right of the existing FEL control, and not mess with the stock control at all. It will be a slight reach but as this is just for changing my snow plow blade angle, it seemed practical. A bit over 100 bucks for the brand new valve, nothing for me to mount it, now the hard part!

I was told by my local hydraulic guy (who knows nothing of Kubota's, and is just a all around good mechanic friend with lot's of knowledge on anything mechanical) that all I would have to do is identify the pumped/pressure line on the tractor, and then the return to the tank line on the tractor. Two lines....., two fittings, seemed easy enough, and then he pointed out the two ports on my new valve that would go to my double acting cylinder on the plow. THEN I start hearing about high AND low pressure return to the tank, so I obviously need more expert help before I break into the system. I initially planned to tee into the system at that connector block pictured above, under the right hand step, and then run new lines a couple feet into the new valve, leaving the FEL control completely untouched. Any comments would be appreciated about this approach. I can live with only operating the new valve, while not also operating the existing FEL valve at the same time. I can see where reduced flow could be an issue.
 

flyidaho

Active member

Equipment
L 3301 HST
Feb 28, 2017
410
183
43
IDAHO
I am gradually getting up to speed thanks to the search function here! I'm taking notes as I go.....and the good thing is so far it seems that the new valve I have will work correctly, just getting the basic principle straight in my mind is a good start, I'd never have guessed it works the way it does. Now the terms high and low pressure return make sense. What a resource this site is, my owners manual for the my new L3301 and it's FEL are worthless, you'd think they'd have a schematic of the system, but now I know to come here instead.
 

fendley

Member

Equipment
L3901, LA525, BH77, SVL65-2
Dec 31, 2016
120
0
16
St Marys, GA, USA
I am gradually getting up to speed thanks to the search function here! I'm taking notes as I go.....and the good thing is so far it seems that the new valve I have will work correctly, just getting the basic principle straight in my mind is a good start, I'd never have guessed it works the way it does. Now the terms high and low pressure return make sense. What a resource this site is, my owners manual for the my new L3301 and it's FEL are worthless, you'd think they'd have a schematic of the system, but now I know to come here instead.
The way I added the 3rd function to my 3901 was to remove the PB from the loader controls and add a hose from the loader PB to the 3rd function valve pressure port. The 3rd function valve has the A and B lines to open/close the grapple. Then the PB hose that was on the loader valve get attached to the return/PB port of the 3rd function valve.
 

flyidaho

Active member

Equipment
L 3301 HST
Feb 28, 2017
410
183
43
IDAHO
I'm near a big farm town, with a couple well equipped hydraulic shops so the needed fittings and custom hose lengths shouldn't be a problem. I got side tracked on another hydraulic job, running my 30 ton National crane truck but did get the mounting plate for the new valve welded on the tractor. I figured I'd do the easy stuff first, this area was pretty much dead space so a good place for it. And, I can still crawl in the tractor from that side, the new valve won't be in the way.
 

Attachments

lugbolt

Well-known member

Equipment
ZG127S-54
Oct 15, 2015
4,835
1,588
113
Mid, South, USA
The way I added the 3rd function to my 3901 was to remove the PB from the loader controls and add a hose from the loader PB to the 3rd function valve pressure port. The 3rd function valve has the A and B lines to open/close the grapple. Then the PB hose that was on the loader valve get attached to the return/PB port of the 3rd function valve.

This is exactly correct. I have done 13 or 14 of them since 1 Dec 2017, we get busy from then until 1 Jan.

The landpride kit is easy to put on. Slightly more challenging if there's another hydraulic component connected to the PBY ports (backhoe, rear remotes, etc) but it's still the same principle. The 3rd function goes inline with the loader valve and the tractor's hydraulic outlet block under the right side step. Landpride's instructions can be a little on the misleading side, at least to me anyway. After doing a few, I got used to the DEstructions, usually just give them to the salespeople or tractor buyer without me putting my greasy hand prints on 'em.
 

flyidaho

Active member

Equipment
L 3301 HST
Feb 28, 2017
410
183
43
IDAHO
Moving right along, it's all becoming clear....then today I realized I didn't get that special little plug that converts the new valve for use as a "power beyond" type. Reading the valve info, I found it took pains to point out that the plug currently in place in the valve body is NOT the required plug that I need, which is exactly what I thought at first, "oh, it's already in place," wrong! So then I think back to when I unpacked the valve.....and I don't recall a separate little package with that special plug, but to make sure I dump out the shop trash bin and paw through it, no plug! Before calling Surplus Center I spent time tearing the shop apart for that 3 dollar plug, no dice. Frustrating as I was rolling right along, now I won't get it until Monday earliest. I have my hoses made up, and we have a big storm coming, oh well.

Am I correct in thinking, that that plug, though it looks like a "regular" plug closing off an unused port, has a inner protrusion that sticks into the valve a bit and alters the flow? The pictures I see of it don't really show a good view of it, but that's how I believe it to work. BTW, Surplus Center, as usual, gave me great customer service, even though I pointed out that it was possible I got the darn thing but maybe threw it in the shop wood stove along with the other packing (the last place I'll look, couldn't do it today as I had a fire going....if so a new O ring and I won't have to wait for the replacement) they are sending me one for free, they wouldn't accept my offer to pay for it. That is good old fashioned excellent service. So good, that if I DO find it in the stove, I'll send them 5 bucks for their coffee fund, service like that shouldn't go unnoticed.
 

flyidaho

Active member

Equipment
L 3301 HST
Feb 28, 2017
410
183
43
IDAHO
I got my hoses and fittings all made up, $202.00 from the local shop. Including the $100.00 or so for the control valve, I'm looking at just a bit over 300 bucks for adding a third function, assuming it all works. I'll know when the PB plug gets here. It has since occurred to me, maybe I need a grapple for my FEL bucket, it will be easy to add one now!
 

flyidaho

Active member

Equipment
L 3301 HST
Feb 28, 2017
410
183
43
IDAHO
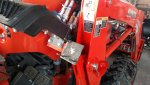
I received my power beyond adapter plug today from Surplus Center, and to my surprise it was a tiny little thing. Closer inspection (and a fuller reading of the valve literature) showed you first remove the big side plug, and then inside of the valve body is another smaller threaded port that the PBA plug screws into, that was not how I envisioned it working, but now all is clear!

Since my valve is all hooked up and bolted down, I had limited access, and I wasn't sure but it appeared that maybe if I got unlucky while inserting the little plug through the bigger hole, just stuck on the Allen wrench, it MAY have been possible to drop it inside the valve body! I went for it, stuck it in there and when it felt like I had a thread engaged, turned the wrench, o nly then to discover that after only a half rotation I was up against something in the way, precluding any further turning of the wrench. So I had to disengage the wrench, while hoping I didn't hear a TINK while the plug disappeared forever inside the valve body. After first checking to make sure I had multiple Allen wrenches the same size, I cut one down to fit my working area, and then found I had indeed successfully threaded it, and a moment later it was snugged down. I still don't know if my fear of dropping it inside was possible, don't care now either. Then the big plug went back in, and it was time to fire it up.

After waiting about 20 seconds to get the empty lines filled, and the traditional tightening of the one fitting I had somehow missed earlier (and throwing some sawdust I luckily had a few feet away on about a half qt. of gushed out hyd. fluid) it was time to try the controls. First the plow angle change new valve, it moved a bit and then clunked, the same the other direction, hmmmm. Then the FEL bucket curl function, it worked perfect, then the up and down, NOTHING. Then the three point hitch, NADA. So I shut it down, and then noticed I had neglected to unchain the plow, from a few days ago when I thought I may have to use the plow before the project was complete. Chain removed, it worked much better, perfect in fact.

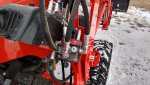
I know what I did wrong, I disregarded the way teg said to "tee the low pressure line", what I did was:
1. First identified the high pressure going into the FEL valve, then it's reciprocal low pressure line going back underneath.
2. Then I disconnected that low pressure line, and made up a new short line going from that now unused fitting, and plumbed direct to my new valve's input, or what I choose to call it's input, don't think it matters.
3. Then, I hooked the hose I had first disconnected off the FEL valve, directly to the remaining port on the new valve, leaving it's other end untouched, where it goes underneath. My screwup was right there (I'm pretty sure...) my next move will be to get a TEE, and have my new short line coming out of the FEL valve go into one leg, and another short line exiting the new valve going to the second leg of the TEE, with the same existing line going under the tractor (the low pressure return) going on the final leg. Not a huge deal, and I have easy enough access to everything. I'll report back and post a picture.
 

flyidaho

Active member

Equipment
L 3301 HST
Feb 28, 2017
410
183
43
IDAHO
The next morning, before doing anything, I realize i did it wrong all right, but a different wrong then what I thought last night, I really must read instructions more and not wing it. What I SHOULD have done, is after the little PBP is inserted inside the valve, THEN my new pressure fitting outlet goes into that same fitting, into it's larger threads. What I did was first put the little plug in, then put a large plug over it, no mystery why it didn't work. No excuse either, the instructions are pretty clear, one just has to study them a bit.
 

flyidaho

Active member

Equipment
L 3301 HST
Feb 28, 2017
410
183
43
IDAHO
Well, not to confuse the issue any more then I already have, but tomorrow I'll pick up one more needed length of hose I was lacking, and then post the results. I don't want to scare anyone off who may archive/search the subject, and have my lack of reading the instructions put them off the project! Look at it this way, I'll be the poster child on how to do it wrong, but still pull it off. No damage was done, and I'll still be in it less then $400.00. Plus, knowing (or at least thinking I know) what I do now, I could do it again in a couple hours. I may even post a list of what I used, like I said I did have the advantage of a real sharp hydraulic shop so all my fittings are what they should be.

One example: a couple places I threaded the hose right into a hydraulic block, without using a fitting, a flare type fitting anyway, having the proper termination on the hose made this legit, and made for a less expensive and cleaner install. I still don't know the term for that type fitting, but it's on my receipt and I may just post the entire thing. I also don't have a lot of parts left over as I bought just exactly what was needed. I've been super busy on my main hydraulics job, operating my small crane service, (we are really booming, pun intended, here in SE Idaho) that I was guilty of rushing through the project at first, and not taking it seriously enough to read the darn instructions. When my 30 ton National needs work, I just drop it off at a local shop I trust and ask them to call me when it's fixed!
 

flyidaho

Active member

Equipment
L 3301 HST
Feb 28, 2017
410
183
43
IDAHO
The missing link, so to speak, was the return to tank line. Now everything works as it should. I used a running Tee, I just removed the existing hose, and one end of the running Tee has a female/flare end so it went right on the male flare) at the FEL valve, then the stock hose went back on the other port of the tee, it having a male flare end. The remaining Tee port was for my new 37" long hose, with one end of that screwing directing into the new hydraulic block (on top of it, as TEG ,mentioned, this valve gives you the option of going into the top or side) and the other end with a final female flare. The least amount of fittings possible, thanks to my well supplied hydraulic shop, no adapters etc.

The additional cost was only about $43.00, bringing my entire cost for adding a third function (single lever) valve to my year old L3301 to less then $400.00, plus I got an education on how my tractor's hydraulic system is set up. I'll post a couple pictures in a day or so. Thanks for the help all who did, and for those debating as to whether or not to do it yourself, think of the 6 to 8 hundred bucks you'll save!
 

flyidaho

Active member

Equipment
L 3301 HST
Feb 28, 2017
410
183
43
IDAHO
A close up of the new valve with the completed plumbing. Note how the valve offers you the option of going into the side, or the top, that was a handy feature and helped keep the hose runs clean as possible. I did have to pop off the quick releases for the loader, to get a wrench on the tee fitting that goes to the tank, the first time I have used them. Cranes like mine don't have them! They work real slick, I also got the protective plastic caps for my new ones, to keep them clean when unhooked.

Once I determined it was fully operational, I was able to ascertain where and how to route the hoses up front. I welded a "clamp,beta,twin series" to the area of the FEL arms that has the big gusset, just tacked it really. Then painted to match with my 15 dollar can of genuine Kubota paint I bought from the same dealer I bought the tractor from. Sure it would have been a nice gesture for him to throw in the paint for free, but business is business, so no need or desire for me to buy anything from them again, I'll go elsewhere. Just maybe they should have thrown in the paint after I gave them well over 20K? A few days ago, when I called and talked to a service guy about which hoses do what, (which were the high pressure, low pressure, and to the tank, not that complicated, and not like I was going to take up his entire day) he said he'd get back to me, and never did. Thanks to the info gained here, who needs them? I did get a good price though so no big deal. the last thing I did was make sure that anywhere there was any possibility of a hose moving or rubbing, was padded with zip tied radiator hose, my usual way. Now I only have one more problem, we have almost NO snow here, last year this time I had banks of snow 8' high, near record setting, this year, nada. Figures!
 

Attachments