Feedback: How I replaced my Kubota L35 fan belt:
Following some days of thinking and planning for the job, yesterday became my "big day" to do it. Total time was about three hours, so working inside a shop was good for me and will be good for you, too.
With no Kubota dealer and shop nearby (3 hours from us), I went to Napa with the belt's part number (15469-97010), and Napa had the cross-referenced belt in stock (#9425). Kubota, Napa, nor the internet had any specs for the Kubota belt, but the Napa belt is 31/64" x 42 7/8" (12.5/13mm x 1090 mm).
Here is the procedure I used:
1. If you have the vertical space, and if your hydraulic system doesn't leak or bleed pressure so that your hydraulic rams are "locked," then raise the bucket to get it out of your way. You will appreciate the better access! My bucket control valve bleeds pressure slowly, and, not knowing how long my repair would require, I elected to leave my bucket on the ground. With some access difficulty, I was able to effect the repair (I'm 5' 9" and 180 lbs)
2. Disconnect the battery's negative cable. Remove the sheet metal sides and top.
3. Remove the muffler (4 10mm bolts). This completes the easy part!
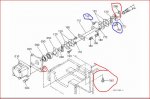
4. Standing on the left front tractor tire, look down into the "pit" between the radiator fan and the front end of the engine. You will see the crankshaft pulley, a small U-joint, and a small diameter shaft running into the forward portion of the tractor. Now crawl under the front of tractor, and look upward into the steering gear. You will see the hydraulic ram controlling steering on the right side and a hydraulic pump on the left, which is driven by the shaft described above, along with a second identical U-joint. Both U-joints are built around fiber composite disks that have just enough flexibility to create universal joints. Four bolts running through the disks connect the small drive shaft to the crankcase shaft and the hydraulic pump. Your job is to remove the four bolts, U-joint disk, and aluminum spacer from the U-joint just forward of the crankshaft pulley (12 mm all).
5. To remove the four bolts, you must be able to turn the engine crankshaft without starting the engine, so that you each bolt will be accessible. Put your transmission in neutral so that you can rotate the crankshaft. I used a pair of large arc-joint pliers (Channel Locks) to turn the 3" diameter circular metal block that is just forward of the crankshaft pulley. Yes, I had to overcome engine compression, but I could move each U-joint bolt to or near the "top" to get my wrenches onto each bolt. Once each bolt is accessible, take a pair of Vice Grips to the front end of the tractor and clamp them onto the aluminum spacer bar that is at the hydraulic pump U-joint. When you begin loosening the bolts at the rear U-joint, the Vice Grips will bump up against the tractor's frame and lock the shaft, allowing you to loosen each bolt you can reach. You'll use the same trick when you tighten them up later.
6. Remove the two hex nuts and locking washers (from the forward end of the U-joint), paying attention to their order when you reassemble. Notice that there is insufficient space in the U-joint to remove the two hex bolts. I removed my hex bolts by first passing a loop of rope around the small diameter shaft and bringing the ends of the rope horizontally out of the left side of the tractor so that my (petite) wife could take hold of the rope and pull the shaft horizontally until the hex head of the left bolt cleared the U-joint. Then I withdrew that bolt. Then I passed the ends of the rope horizontally out of the right side of the tractor, where my wife pulled and I removed the right bolt. Note the washers on each bolt.
7. Two down, two to go. The remaining two bolts pass through the fiber composite disk, through an aluminum bar spacer, and into drillings into the circular steel block just forward of the crankshaft pulley. Remove those bolts and catch the aluminum spacer before it falls deeper into the "pit."
8. You have now created a gap in the hydraulic pump drive shaft through which you can easily pass the old and the new fan belts. Loosen the alternator's fan belt adjusting nut (12 mm) and the pivot shaft (14 mm), slack the fan belt, and work it off of the alternator pulley.
9. You will need to pass the old fan belt around the radiator fan, unless you wish to save time by cutting it. However, I recommend passing it over the fan simply for practice. The new belt is quite a bit stiffer, and the practice is worthwhile. To get more clearance between the plastic fan blades and the radiator's air shroud, remove the two 10 mm bolts holding the shroud to the top of the radiator. Now, worry the old belt off and the new belt on. Take your time--it's a plastic fan, and if you fracture a blade or a portion of a blade, replacing the fan is not going to be a joy, by the looks of things! [I have a diesel electric generator using a 3 cylinder Kubota diesel, and even though the entire engine is out in the open, it is a pain to replace the fan--I've done it twice in 16 years, last one 6 weeks ago. I had to remove the radiator to make it happen. Good time for coolant replacement, but no fun. Your tractor will be worse, so take your time. Mount the belt onto the three pulleys to keep it out of the way.
10. Reverse the above sequence to reassemble the rear shaft U-joint. Call your wife again, and get out the rope, and install the nuts and bolts first. The shaft to the hydraulic pump is easy to turn before the U-bolt is reassembled, so "all you need to do" is to line up the remaining bolt holes with the drillings in the circular steel block at the crank pulley. Borrow your wife's small pocket mirror (I used a dental mirror) to align the holes, and then carefully insert the aluminum spacer block into it's place. From there, it's Braille as you jimmy the aluminum spacer and the U-joint's flexion to finally feel the bolt threads engage the tapped drilling. I found it best to first rotate the engine crankshaft so that the aluminum spacer would be horizontal and not vertical (yep, I dropped the spacer into the bottom of the pit a couple of times. No big deal, but my wife was watching her "Hero," which is fun only when things are going well). If your hydraulic pump shaft refuses to rotate, it's because your Vice Grips are still attached to the other U-joint! Just get them, say something clever to your wife, and put them into your tool box, for you are finished with them.
11. Torque down the U-joint bolts, adjust belt tension and tighten alternator bolts, replace muffler, reconnect battery negative cable, and test run your engine. When satisfied, replace the decorative orange sheet metal. Like mine, I hope your fan belt outlasts the tractor, but Kubota built a tough brute, didn't it?
Hope this is helpful to you!
Dan