Lights on my BX23S ROPS. What I learned

RWey56

Member

Equipment
BX23S
Feb 8, 2018
111
3
18
Stanchfield, MN
I know there's another rather long thread on this topic, but I'm posting new because I want folks considering this to avoid the small mistake I made. I'll post pics later, as I'm tending to Mother's Day.

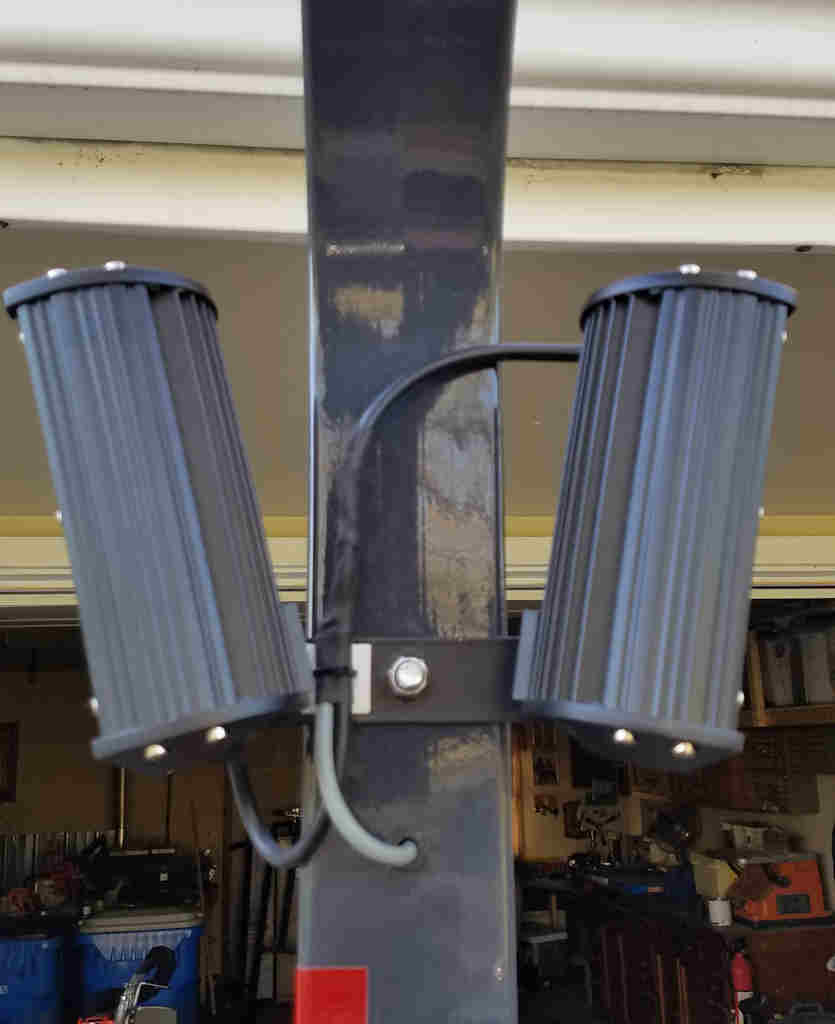
Like many people, I put four LED floods on my ROPS, two forward, two backwards. I used the existing side holes near the top and while everything went well and the install looks good, I realized when the ROPS is folded down and I'm mowing under low branches, it catches the fwd lights and twists the mount. Not good.

Thus, my recommendation to anyone doing a similar light system would be to seriously consider a quick disconnect scheme for the lights with a 4-position connector up by the lights. I still might do this as I have a lot of trees with lower branches I mow up close, and if I keep whacking them, I'm eventually going to break them.
 

prof.fate

New member

Equipment
75 L175, 14 toro timesaver, Landpride boxblade, countyline auger
Nov 9, 2017
155
1
0
Beaver, PA
this is my first experience with a ROPS equipped tractor and well, i've hit a few branches while mowing and brush hogging...the branches (so far) come down and i've not yet broken my lights or bent the brackets - much to my surprise.

It's a learning experience though!
 

RWey56

Member

Equipment
BX23S
Feb 8, 2018
111
3
18
Stanchfield, MN
As stated, here's the pics.

First, I opted to auger holes in my dash, which at first made me cringe a bit but after it was done, I'm glad I did. Not going to bore you with pics of the wiring; just ran as much as I could thru the ROPS and tucked the rest under the fenders and footboards with peel and stick zip tie mounting blocks. Worked great. Inside below the dash, I added a couple of inline mini fuse holders to the positive terminal of the battery (allowing the lights without the ignition turned on) and wired the rest up to the left of the battery. Easy, it's done properly, and looks nice.


Here's the lights themselves. They're the standard Aaiwa 4-pack floods, 3600 lumen (each) LEDs, which provide ample light for night work. A lot of folks have used these. Rather than U-bolt mounts to the top of the ROPS, I used the two existing bolt holes on the sides: Top hole holds a simple 1/8" steel spanner bar to mount both lights, bottom hole to run the wire in. The wire exits a hole in the low non-foldable part of the ROPS. A bit of slack inside lets the ROPS fold without chaffing the cable at all.

As you can see, everything wired up nice, a grommet in the lower hole prevents chaffing, and I heat shrunk the connections. THIS is where I made my mistake. What I should have done is get a plugable 4-position connector and probably a serrated wing nut to tighten on the spanner bar holding the lights. That way, when mowing under the trees with the ROPS folded back, the lights can come off with a simple wing nut and a connector. Anyway, I'm likely going to update mine and that's what I'd recommend to anyone considering this addition to their BX23.


For anyone wanting to do similar, let me know and I can post the electrical part numbers ( purchased from Digikey ) for the switches, fuse holders, cable, etc. The Aaiwa lights can be found on Amazon ... where else?
 
Last edited:

2 Bears

New member
Feb 27, 2018
43
1
0
PA
I am currently looking at doing this as well, how did the wires route thru the joint in the ROPS i too want to run the wire like that but Im a little concerned about chafing in the joint as the ROPS is up and down everytime im in and out of the garage.
 

RWey56

Member

Equipment
BX23S
Feb 8, 2018
111
3
18
Stanchfield, MN
I wouldn't use discrete wires, but the cable I used had quite a thick jacket. Just leave enough slack and it should be okay. If it does ever wear thru, well ... that's why you fuse the 12V source. The one thing I discovered, however, is the lower ROPS bar isn't open all the way thru. I couldn't even get a fish tape thru it. There's a hole just below the fold joint so I ran the cable back out thru that. It at least hides the upper part of the run.
 

RWey56

Member

Equipment
BX23S
Feb 8, 2018
111
3
18
Stanchfield, MN
2 Bears,
What I should have mentioned is to properly route thru the ROPS, I had to park under a tree limb and hold the ROPS up about an inch ( after removing its pivot bolts ) with a rope. Too awkward trying to hold the bar up while stringing the cable.
 

2 Bears

New member
Feb 27, 2018
43
1
0
PA
Thank you RWey56, looks like i have some investigating to do. I want everything to look as stock as possible and wire loom zip tied to the ROPS just isnt it for me.
 

RWey56

Member

Equipment
BX23S
Feb 8, 2018
111
3
18
Stanchfield, MN
Thank you RWey56, looks like i have some investigating to do. I want everything to look as stock as possible and wire loom zip tied to the ROPS just isnt it for me.
You won't completely escape exposed wire, but you can at least hide it in the upper part of the ROPS. Where mine exits the hole in the bottom part and runs the rest of the way down, you can't even notice them. And don't use the wire looms. Get some 4-plex cable like I did. It's only about 1/4" OD and it provides a tough shield.

Here's the Digikey part numbers for the not-so-common parts if you're interested: ( www.digikey.com )

Qty PN Descr
2, T1283-5-ND .... Cable, 18 AWG, 4-conductor, 5 meter.
4, 36-740-ND .... Rubber Grommet
2, CW103-ND .... Illuminated SPST Switch, Red LED, 12V, waterproof
2, F3207-ND .... Inline mini fuse holder

I'd strongly recommend buying two extra switches as there's no telling when these OEM's will obsolete them. The rest of the odds and ends ( stick on zip tie blocks, zip ties, heat shrink, etc ) you can get at Menards or such. For the switches you'll need a 13/16" spade bit and will have to cut it short, or remove the steering wheel, so you can a drill in place.
 

2 Bears

New member
Feb 27, 2018
43
1
0
PA
I don't know if anyone else is interested or not but i borescoped the bottom of my ROPS and right at about the fender these blocks are inside the ROPS. I took a piece of steel tie wire and was able to bypass the block in the corner. Its not a lot of room, YMMV. I am debating pulling single conductors past the blocks then switching to a multi-conductor for the remainder of the run.


RWey56

Member

Equipment
BX23S
Feb 8, 2018
111
3
18
Stanchfield, MN
Thanks for the investigative work. I suspected something like that, and from the looks of it there's not much room ... not sure if the cable would have fit. I'm OK with them running on the outside for the lower half of the ROPS, tho. Left to do is eventually switch the top wiring over to a connector. The lights themselves I'm pleased with. Very bright, and less than $40 for a set of 4. How they can make this stuff so cheap is beyond me.