B6200HSTD Help

Marengo

New member

Equipment
B6200HSTD 4WD, Land Pride FDR1548, Woods BR60, 4' Brush Hog, DIY 8'Yard Trailer
Jun 4, 2015
15
22
3
Marengo,Ohio
1st post on OTT
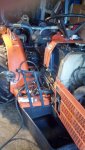
I have a '88 B6200HSTD 4WD that has served me faithfully.
There are 2 questions/problems I need to resolve.
1st...Steering,
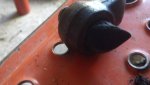
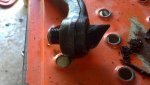
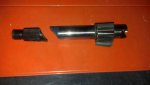
I snapped the Sector Shaft off between the Steering Gear Case and the Pitman Arm (idiot operator error by getting the left front tire under a guard rail while mowing along the road). Can I replace the Sector Shaft only, meaning not tearing down everything above Steering Gear Case.
2nd...Hydraulic System Control Valve 3PH
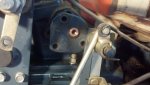
The 3PH keeps fading while using the brush hog. I have to keep pulling the Control Lever up to keep the hog level. I bought 2 new Spring Plates and U-Nut to see if that works. If I have to rebuild the valve, what might I need to replace and is this something that someone with average mechanical aptitude can do?
Thanks,
Jim
 

CJN8

New member

Equipment
B2650HSD, LA534 FEL, Gearmore Box Blade, Bush Hog, Cimmeron Rake
Nov 16, 2013
122
0
0
San Diego, CA
The 3PTH leak down is most likely caused by a poor sealing lift piston. Good thing is that it's an easy fix. Remove seat and associated brackets. Remove the four bolts on the hydraulic piston cover. Pull the lift piston out and install new Oring and new backup ring. Dress the hydraulic cylinder to remove any linear scratches, a brake cylinder hone works great to restore cross hatch. Lastly reassemble. I did this on my old b7200 and the implements would stay up for days with zero leak down.
 

North Idaho Wolfman

Moderator
Staff member
Lifetime Member

Equipment
L3450DT-GST, Woods FEL, B7100 HSD, FEL, 60" SB, 743 Bobcat with V2203, and more
Jun 9, 2013
28,680
5,108
113
Sandpoint, ID
You might be able to get the selector shaft out without pulling the rest, but alignment of the gear and nut ball might get tricky on reassembly.

Agree with CNJ8, drift is mainly from the piston seal leaking.
Does it have proportional control? That being that the 3 point arms move in relation to the lever position? If you do then a loose handle will cause issues! ;)
 
Last edited:

Marengo

New member

Equipment
B6200HSTD 4WD, Land Pride FDR1548, Woods BR60, 4' Brush Hog, DIY 8'Yard Trailer
Jun 4, 2015
15
22
3
Marengo,Ohio
CJN8, Wolfman,

Thanks for the replies,
Haven't been able to work on the tractor yet, had to replace u-joints on my '02 F-150 last weekend using what I had on hand, hammer, needle nose, sockets, c-clamp, and torch.
I'm going to start with the spring washers on the Control Lever Arm. If that doesn’t work I'll head for the lift piston seals next. I did get my new Sector Shaft form the dealer, about $260.
I'm going to try to pop it in without removing the Steering Box from the tractor this weekend.
I'll update the post on my success and frustrations.

Thanks,
Jim
 

Marengo

New member

Equipment
B6200HSTD 4WD, Land Pride FDR1548, Woods BR60, 4' Brush Hog, DIY 8'Yard Trailer
Jun 4, 2015
15
22
3
Marengo,Ohio
My theory of auto maintenance times don't apply to the Kubota. If it takes 20 minutes to change the oil on the truck it will really take an hour. The Kubota is more like 5 or 6 times longer than you think it should take.

I did replace the Spring Washers on the Control Lever Arm. It wasn't as simple as it looked. The lock nut could not be removed without taking off the seat and removing the control lever valve cover. The new washers did help a bit but I'm going to have to pull the lift piston now and replace the seals. As for the sector shaft, the side cover can't be removed in place on the tractor. It won't clear the throttle linkage mounting post that's welded to the frame. I'll have to remove the dash, fuel tank, and fuel tank support to get to the steering box.
I'll update again later tonight, might post a few pics too.
Jim
 

Marengo

New member

Equipment
B6200HSTD 4WD, Land Pride FDR1548, Woods BR60, 4' Brush Hog, DIY 8'Yard Trailer
Jun 4, 2015
15
22
3
Marengo,Ohio
Here's what I've learned. Pulling out the steering box was a piece of cake. Pop off the steering wheel, unbolt the dash, document and disconnect a couple wire connections and tach cable, remove fuel line from fuel filter and drain and remove fuel tank. 4 bolts and you have the steering box off the frame. Remembering that I broke off the sector shaft at the steering box. Once the steering box is off the tractor drain the gear oil, remove the adjusting screw locking nut from the cover plate, unbolt cover plate, turn IN adjusting screw to remove cover plate. Turn steering wheel shaft and note sector shaft gear alignment in relationship to ball nut comp. Turn steering wheel shaft to align sector shaft to be pulled from steering box. Push or pull it out. Reverse it all to put it all back together and don't forget to refill the gear box. Might also be a great time to replace that fuel line from the bottom of the tank to the fuel filter too. My problem has been removing the snapped off section of sector shaft still stuck in the pitman arm. I tried to remove it while the pitman is still attached to the tractor. I'll try to remove the pitman and if that fails I'll try to remove the drag link and pitman as one to try and pound out the broken sector shaft.
Jim
 

Attachments

Marengo

New member

Equipment
B6200HSTD 4WD, Land Pride FDR1548, Woods BR60, 4' Brush Hog, DIY 8'Yard Trailer
Jun 4, 2015
15
22
3
Marengo,Ohio
OK, went to work Monday thinking about how to solve the pitman arm problem. The answer was simple. Use the drag link against the pitman arm to get it off. Swing the drag link over the front tire. Move the pitman arm so it parallel and over top of the drag link. 3 easy whacks with a framing hammer near the top of the pitman and it popped off.Took the pitman with the broken sector shaft still stuck in it to a block of wood with a hole drilled in it large enough to accept the broken sector shaft. A couple of good whacks with a 3lbs sledge hammer and it popped right out. Reassembled the steering assembly and test drove the tractor. I did readjust the position of the steering wheel several times before I bolted it down. Now at least I can drive the tractor and use the finish mower. I ordered new lift piston seals for the 3ph. I hope to have them by Friday. Updates to follow...
Jim
 

Attachments

CJN8

New member

Equipment
B2650HSD, LA534 FEL, Gearmore Box Blade, Bush Hog, Cimmeron Rake
Nov 16, 2013
122
0
0
San Diego, CA
Before you know it you will have that old girl back up to snuff. Nice work.

Nate
 

Marengo

New member

Equipment
B6200HSTD 4WD, Land Pride FDR1548, Woods BR60, 4' Brush Hog, DIY 8'Yard Trailer
Jun 4, 2015
15
22
3
Marengo,Ohio
3ph lift piston seals,

It's the Saturday morning, CarTalk is about to come on, and I have time to finish working on the tractor. I picked up the new 3ph lift piston seals mid week. I removed the seat and seat mounting bracket. Cleaned the area around the lift piston cylinder cap. Tried to remove the cap after removing its bolts. I could rotate the cap but couldn't pull it out and I didn't want to pry it out. After reviewing the parts diagram again I unhooked the upper lift arms from the lower link arms. I raised and dropped the upper lift arms and It popped the cap right off. Now I can't get a hold of the piston. Lifted and dropped the upper lift arms a few more times and was able to remove the piston. There were some scratches on the piston and cylinder and I don't have a brake hone. I hand polished them both with a hydro coated fine Scotch-Brite pad. Cleaned everything up, replaced seals, re-coated everything with new hydro fluid, and put it all back together. It took less than a hour and it's still holding the brush hog mid air where I left it 90 minutes ago.
Now I can mow again, if it every stops raining...
Thanks, Jim
 
Last edited:

seant

New member

Equipment
b6200hst
Apr 18, 2016
23
0
0
Morgan Hill, CA
Did you need to drain the hydraulic fluid in order to do this? I need to replace my lift arms and shaft and need to do something similar in order to get to them.
Thanks
Sean

3ph lift piston seals,

It's the Saturday morning, CarTalk is about to come on, and I have time to finish working on the tractor. I picked up the new 3ph lift piston seals mid week. I removed the seat and seat mounting bracket. Cleaned the area around the lift piston cylinder cap. Tried to remove the cap after removing its bolts. I could rotate the cap but couldn't pull it out and I didn't want to pry it out. After reviewing the parts diagram again I unhooked the upper lift arms from the lower link arms. I raised and dropped the upper lift arms and It popped the cap right off. Now I can't get a hold of the piston. Lifted and dropped the upper lift arms a few more times and was able to remove the piston. There were some scratches on the piston and cylinder and I don't have a brake hone. I hand polished them both with a hydro coated fine Scotch-Brite pad. Cleaned everything up, replaced seals, re-coated everything with new hydro fluid, and put it all back together. It took less than a hour and it's still holding the brush hog mid air where I left it 90 minutes ago.
Now I can mow again, if it every stops raining...
Thanks, Jim
 

North Idaho Wolfman

Moderator
Staff member
Lifetime Member

Equipment
L3450DT-GST, Woods FEL, B7100 HSD, FEL, 60" SB, 743 Bobcat with V2203, and more
Jun 9, 2013
28,680
5,108
113
Sandpoint, ID
Did you need to drain the hydraulic fluid in order to do this? I need to replace my lift arms and shaft and need to do something similar in order to get to them.
Thanks
Sean

No you do not. ;)
 

Marengo

New member

Equipment
B6200HSTD 4WD, Land Pride FDR1548, Woods BR60, 4' Brush Hog, DIY 8'Yard Trailer
Jun 4, 2015
15
22
3
Marengo,Ohio
Did you need to drain the hydraulic fluid in order to do this? I need to replace my lift arms and shaft and need to do something similar in order to get to them.
Thanks
Sean
Sean,
I did not have to drain the hydraulic fluid when I replaced the lift piston seals. The replacement of the seals was not messy at all. In replacing the lift arm shaft you may have more fluid lost but I don't know for sure. There may not be fluid up in the shaft area unless the tractor is running. I would give it time to drain down. If you need parts diagram or a work shop manual for the B6200HST I have them.
Let me know how it goes...
Jim
'85 B6200HST 4WD
 

seant

New member

Equipment
b6200hst
Apr 18, 2016
23
0
0
Morgan Hill, CA
Thanks. I wonder do you have to drain the fluid to remove the lift cover? Or rather, do you need to remove the lift cover in order to replace the shaft/arms?

I have the manuals, (thanks, wolfman) but it's not clear if it needs to be drained to do the above.

Sean

Sean,
I did not have to drain the hydraulic fluid when I replaced the lift piston seals. The replacement of the seals was not messy at all. In replacing the lift arm shaft you may have more fluid lost but I don't know for sure. There may not be fluid up in the shaft area unless the tractor is running. I would give it time to drain down. If you need parts diagram or a work shop manual for the B6200HST I have them.
Let me know how it goes...
Jim
'85 B6200HST 4WD
 

North Idaho Wolfman

Moderator
Staff member
Lifetime Member

Equipment
L3450DT-GST, Woods FEL, B7100 HSD, FEL, 60" SB, 743 Bobcat with V2203, and more
Jun 9, 2013
28,680
5,108
113
Sandpoint, ID
Thanks. I wonder do you have to drain the fluid to remove the lift cover? Or rather, do you need to remove the lift cover in order to replace the shaft/arms?

I have the manuals, (thanks, wolfman) but it's not clear if it needs to be drained to do the above.

Sean
No it does not need drained, yes you need to remove the cover. ;)
 

seant

New member

Equipment
b6200hst
Apr 18, 2016
23
0
0
Morgan Hill, CA
Looks like the replacement arms I got have a pin spring and solid arm instead of a gap and a bolt. Other than that they appear to be exactly the same. Does anyone know how to install the pin spring correctly? The WSM doesn't really cover that.
 

seant

New member

Equipment
b6200hst
Apr 18, 2016
23
0
0
Morgan Hill, CA
Turns out you just bang them in with a mallet:) even though this kit was different from the original specs for the 6200 it worked great.

Messicks even said in an email it was for the 7100 only but that's totally incorrect. Shaft, arms and pins were only 200 instead of much more for the individual parts.

I made a couple mistakes putting everything back together but it's all fixed now. Adjustment of the limiting rod thing was slightly different.

Waiting on the lift pin replacements now and should have it all running by this weekend.

http://www.messicks.com/part/h6710-99200/kit-arm-lift

That's the part I went with

Sean