My Kubota Cab

gregger

New member
Lifetime Member
May 30, 2014
75
5
0
Saint John, NB Canada
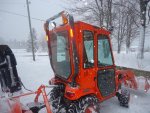
OK, so I've hinted a couple times on here after I built my last two trailers that I was planning a Cab for my BX25D, so time to put my money where my mouth is. -Warning: This will be a long read. Photos following the text.

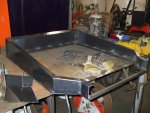
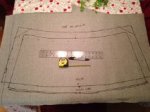
I spent a couple weeks sketching, planning, and researching cabs on-line, comparing builds, desired features, and some not-so-desired features on home built cabs and factory cabs. The finished cost of the factory cabs, landed here in Atlantic Canada was scary, esp with the falling Cdn. dollar and freight, so I bit the bullet, bought 2 X 22 ft. lengths of 1" sq. tubing, 4 lengths of 3/4" sq. tubing, and a 4' X 8' sheet of 16ga. sheet steel. I run an Asphalt Emulsion mfg. facility, and winters are dead season, so I did the build in the heated plant, where I have all cutting, grinding gear, plus cutting torches and a sweet Lincoln Mig180 wire welder, plus a big stick machine if needed for heavier work. I knew what I wanted for lighting, so when I began the build, I also tapped Amazon.ca for all the LED lighting units, Front and Rear Windshield Wiper Units, the Windshield Washers, plus scoped out E-Bay seller for the Amber LED Flashing units and the door rubber self-stick weather stripping.
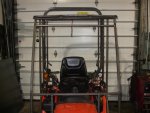
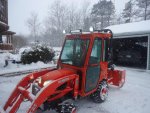
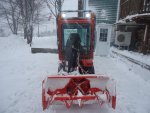
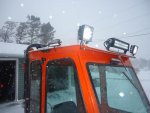
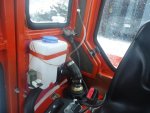
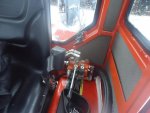
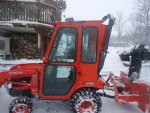
Being the BackHoe model, I wanted the rear glass panel removable to be able to swivel the seat around and use the backhoe. I kept the cab height slightly lower than the ROPS, including the rear lights, and I did not need to make the roof to raise, and have lots of head room climbing into the seat for backhoe operation.
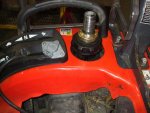
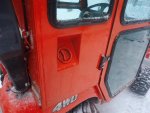
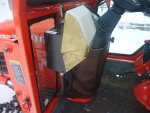
One more desired feature was to have an external Fuel Filler Neck, as it was difficult enough to raise the 5 gal. Diesel jug to the fuel cap, without having the cab door pillers in the way. Tektite Cabs had such a feature on their cabs, and knew I could build such a thing quite easily.
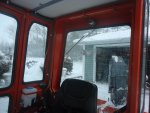
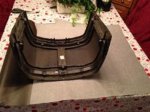
I decided early on, I also wanted tempered Safety Glass, set in rubber, so contacted our local Speedy Glass shop, to get particulars of what I needed to do to make it all work. They only needed 3/4" clear metal to install the rubber gasketing, and wanted a 3" radius for corners (He said use the inside of a masking tape roll as pattern). I enquired about plexiglass/lexan, they told me the tempered safety glass was cheaper than the acrylic, and albeit heavier, would not crack or scratch.
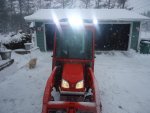
I read the many articles on the cabs, factory and homebuilts, and a common thread was the inherent noise from the 'tin-can' enclosure which amplified the engine and gear whine. With this in mind, the plan became to isolate the cab from the tractor as much as possible.
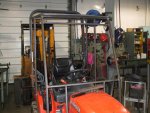
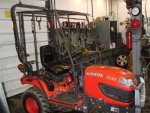
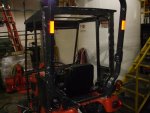
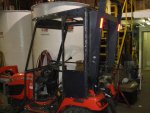
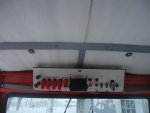
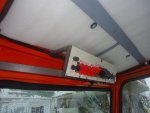
I built the cab with 6 mounting points, and am able to lift off the cab with a small hoist or in my case I had access to a forklift and a strap sling, thanks also to built-in lifting lugs on the sides, bolted through the roof to the framework, as part of the side-lights.
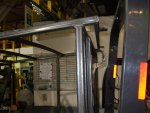
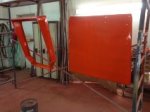
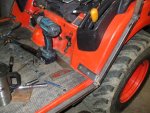
I probably could've/should've used only 4 mounting points, front of floor pan and rear ROPS mount, but my method balances out the weight on 6 points, being also mid-mounted at beginning of rear fenders. I have access to lots of 1/8" thick red rubber sheet gasketing at my work, and did use it between all mounting points, plus used it as my front hood dam/shield, fitting it one piece around the engine hood down the front lowers. I can reach the hood latch from inside, and simply flex the rubber to open the hood. Closing is the reverse. I also used the rubber at the rear corners where the ROPS meets the cab corners, plus along the underside of the rear removable window, with a small cut-away for my rear hydraulic hoses and the Blower Chute control cable.
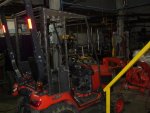
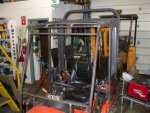
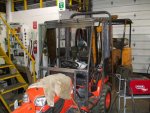
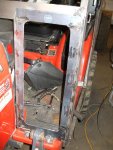
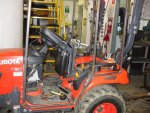
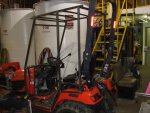
I'm going to stop rambling here, and post some photos of the build, will continue with my How-I-Did-It, later.
 

Attachments

Last edited:
  • Love
Reactions: 1 user

85Hokie

Moderator
Staff member
Lifetime Member

Equipment
BX-25D ,PTB. Under Armor, '90&'92-B7100HST's, '06 BX1850 FEL
Jul 13, 2013
10,342
2,166
113
Bedford - VA
That is fantastic !!!

Couple of questions.....
Excluding labor - what cha got in it? (convert to US if possible)

Love to see more pictures - rear, front , hood area - so on.

You had to have a hellva lot of "well, if I do this, then I need to do this first" thoughts......

really nice job!
 

MadMax31

Member

Equipment
BX23S, 60" MMM
Nov 5, 2014
766
8
18
New York
Im making mine the same way. 1" square tubing with 18ga skin. Looks like the same door latch too. Just built my door Friday, and lift-off hinges shipped today. Im going with laminated glass for windshield and safety glass everywhere else. Hope mine turns out as nice as yours!
 

gregger

New member
Lifetime Member
May 30, 2014
75
5
0
Saint John, NB Canada
Part Deux of my Kubota Cab build,
After getting the steel, I began with the front lower mount, using one existing hole from floor plus drilled one more, for tabs welded to 1" box steel. Yes, I could have simply drilled down through the 1" square tubing, but wanted a little more space to the FEL mount, for the glass and working area.
I followed the general shape of the floor pan to the rear fender, where I drilled for my second mounting point, where I mocked up the tab with the 1/8" rubber gasket. From there, followed the fender up and across to the rear ROPS mounting point. As photos show, I had to work around my aux. hydraulics valve mounted here, but worked OK.
The verticals came next, for the door hinge posts and front windshield frame. I simply eyeballed the desired angle for the windshield, I was at 5deg. for the lower front, to approx. 15deg. from vertical for the windshield itself. The rear vertical followed suit, and the overall width went from 37.5" wide at the front to 43" at the rear, to accomodate the grab handles on the fenders. Note: I knew I was very close to the handles at the rear bottom framework, but it was only when I used the sling strap to remove the cab for final welds and painting I found out as long as I raised one side by one inch before the other, the cab cleared the Grab Handles perfectly - and went back on the same. (Almost as if I had planned it like that -GH)
I wanted a slight arch to the roofline, both to help repel water and for strength, so with the help of simple large C-clamps, was easy to put a 3/8" crown into the roof cross-members. Front and Rear Crossmsmbers were 1" Box, and the middle three were 3/4" Box steel.
As shown in photos, I added a 3" front overhang as a water shield/shade, and to mount the front lights. This worked well, except when installing the separate roof, I realized I cannot do a compound curve(side-to-side crown plus front drop for 3" shade) into the steel sheet without buckling. I solved this by simply slitting the 3" front drop in the center, then Mig Welding the seam back together after clamping all down.
Time for more photos, Return later.
 

Attachments

Last edited:

gregger

New member
Lifetime Member
May 30, 2014
75
5
0
Saint John, NB Canada
Third Chat,
For the roof, I also wanted it to be separate from the framework, and isolated against vibration and reverberation. I had a few 1/2" thick foam rubber interlocking childrens floor mats, 24"X24", which worked perfectly, and I also laid 6mm poly plastic between the foam and the 1/16th steel roof, to prevent any possibility of sweating or condensing. I had the framework tabs pre-drilled, so after all was clamped into place, I simply drilled up through the roof panel, and used 1/4" SS bolts with rubber backed washers and large SS flat washers too.
By now I had all my LED Lights, so drilled for the mounts and power wiring where required. I drilled and test fit for the Windshield Wipers (Front and Back) and drilled out for the heater hoses to pass through the left side lower panel.
The roof was removed and set aside for painting, and I continued to build the rear removable glass panel. It was tricky to frame to match the opening, and a friend suggested I go to a local metal fabricator to have some of the sheet steel sliced and brake-bent to 90deg. to save on making extra framework for the rear panel. I did this, plus also had them shear 8 pieces of the 1/16" steel into 2" wide strips 48" long, to make the facing for the doors to hold the glass. This saved me a lot of slitting discs for my 5" hand Makita hand grinder, not to mention the edge grinding required.
I now had all the sheet steel panels on the main cab framework, Mig stitch welded and trimmed, and began to face the door framework with the sliced strips of the 1/16". On advice from another friend, I drilled 3/8" holes every 6" along the strips and after clamping along the door frames, allowing an outside lip for the rubber weatherstripping, and spot welded into the holes, securing the face steel to the door frame. (Photo to follow will show this detail)
Yeah, time for more photos and coffee.
 

Attachments

Last edited:

gregger

New member
Lifetime Member
May 30, 2014
75
5
0
Saint John, NB Canada
Part Four(Prolly the last)
OK, Doors now framed, panelled and radiused for the glass - Time for the 'Gulp' Rear removable panel. I had framed the facing(mating) frame in 3/4" square tube, and thanks to the brake-bent steel, did not need to frame in the outside facing. I measured up and carefully cut and fit the 90deg. bent pieces for the panel to the framework, and mig'd it all together, then cut rounded corner crescents for the glass fitting. I made simple 'L' shaped hooks cushioned with sections of 3/4" hose and bolted them to the rear upper frame to hold the rear window panel, kind of a Hanging Hinge affair. I bought two rubber stretch hood-latches to hold the bottom in place. I'll also use the peel & stick rubber weather srtipping around the panel after painting.
While building the cab at work during the day, I spent a few evenings designing a suitable Switch Control Panel to mount above the windshield. Our local Princess Auto Store supplied most of the switches, along with some salvage fuse holders, circuit breakers and various switches saved over the years. I planned to have all electrical fed by a simple polarized plug(actually used a Trailer Elec. Plug&Socket), and have all connected and switched at the panel. I ran Pos. & Neg. feed directly from the battery with 10ga. mains to a set of terminals then to a 25amp fuse and to one side of all switches. The switched side went to individual labelled terminal strips. From there, I simply ran each set of lights, wipers, washers, heater fan and aux. fan to the corresponding pos. terminal. I used a negative grounding of the cab frame, so only one main wire needed to be run all the way to the control panel, the neg. wire simply got grounded to the nearest lug screw into the frame. I built the frame for the Switch Panel from very light ornamental steel from a factory built cheap gazebo. It barely was thick enough steel to allow me to weld it. Matter of fact, I chose to pop-rivet and bolt it together after tacking in places.
By now, I had all the cab basically built, with roof panel finished, rear panel complete, doors sheathed, and had the Outside Fuel Filler finished, ready to mount. I built this filler the hard way from scrap/salvaged materials, it did work well, but if I were to build another, would use a 1.5" Thru-Hull fitting through the original cap, and fab the outside part to match. Both pieces are joined by a 6" curved piece of radiator hose, clamped in place. Figuring the fuel cover was vented, I threaded a drilled-out grease fitting in the filler neck, and ran a piece of clear 3/16" hose up to the outside rear roof area as a vent.
My friend who is a very good spray painter, suggested I use automotive Seam Sealer at all joints and seams, to prevent moisture from getting between frame and panelling, and running rust streaks. I bought 3 caulk tubes of UAP Seam Sealer, and squeezed a bead along every exposed seam, inside and outside, and used my finger to spread and smooth it all. -Very messy black stuff, but set up nicely, and took paint very well.
I made a bracket to hold a tool box on the inside left side, it actually will be a 50cal. ammo box. This will hold basic tools, shear pins, etc.
The Universal Windshield Washer kit was installed after adding a second little pump to the side of the tank, for the rear window.
Not quite finished, but time for 5 more Photos
 

Attachments

Last edited:

gregger

New member
Lifetime Member
May 30, 2014
75
5
0
Saint John, NB Canada
Last post, promise!
I did cheat and use a skim coat of Automotive Finish Body Filler in a few places to cover a couple seams around the Fuel Filler.
I tried to buy the door hinges from Curtis Cab, however I almost choked at the price, same as with the $84.00US EACH for the door latches - - So, I built the lift-off door hinges from 3/8" steel tubing, 3/8" X 6" bolts with some short pieces of 1" X 1/4" flat steel, welded up on the workbench. I reamed the tubing with a 3/8" drill bitt to kill the inside pipe seam, and machined a couple oil grooves in the exposed pin areas. These were rattle-can primered and sprayed with Automotive Trim Satin Black.
My Door Latches are Storm/Screen Door Latches from Princess Auto, which gave me inside and outside closures for the grand price of $6.95 per door! -And were available in Satin Black, White, or Brushed Aluminum. -Worked like a charm!
My good painting buddy offered to spray the cab with Epoxy Primer and then finish coat, which was hard to refuse. I had discovered that Rustoleum Industrial Finishes makes an International Orange, which is a perfect match for the new Kubota Orange (See finished Photos), and was only $53.00 per gallon. He reduced it with 20% lacquer thinner and sprayed 3 coats over the epoxy primer. After drying overnight, we used our forklift to bring it up the yard to my facility, lowered it down over the BX25D, slid the red rubber gaskets under the mounting points, and bolted it down. I was then ready to install the roof panel with foam rubber play mats on the frame followed by the 6mm poly roll plastic. Next came the lights, wipers, and washer sprayers, followed by the door hinges and doors. -Oh yes, I did stick on all 32 ft. of the peel & stick rubber weather stripping along the door edges and rear panel.
I then loaded my baby onto my 5' X 12' tilt trailer and took it to Speedy Glass, where they did a beautiful job of installing all the glass in the cab and doors (10 pieces in all). They did comment on my build....I was gushing.

The glass did cost me the most of the build, final invoice was $1000.00, but I like to think I have better than a Factory Cab, at 25% of the total cost. I figured I have approx. $1,600.00 into the build, including the $180 in all the LED Light units, Wipers & Washers. The Square Tubing and 1/16th sheet metal came from Russel Metals, and cost me $320.00 The 5000BTU Coolant Heater unit was on sale at Princess Auto for $120, works great, I built a diverter for the heater to direct the heat to the windshield or the floor, and keeps all windows from freezing or steaming up, having used it for three bouts of plowing and snowblowing in January 2016 so far. I did the heater hookup to the engine from the water pump bypass hose as suggested, used 5/8" heater hose to copper reducers to short pieces of 3/8"ID washing machine feed hose to the bypass fittings. This was simple, and works great.
I brought the tractor home after the glass was in, and finished off all the wiring in my home garage. I used the proper connectors, terminals, looms, etc, and hooked up the Kubota 2789 SnowBlower chute Rotate and Tilt controls on a separate little panel near the rear, with two DPDT(Double-Pole, Double-Throw) Momentary Switches with Center OFF.
All works as well-if not better than planned.
The Switching Panel is from some 1/8" thick Arborite Laminate I had laying around, and I will use more of it to put a bottom to this panel area to store spare fuses or bulbs.
OH, Yes- Most will notice in the final photos, I did the unspoken*Nasty Deed* by re-locating my rear stock Flashing & Signal lights from the bottom of the ROPS (I had popped the lens off three times by mowing around bushes and in deep snow). So- yes, I did slice off the original lower mounts, shortened them by 50% and re-welded them at the inside top of the ROPS where they SHOULD have been! and Yes, I also drilled two 5/16" holes to feed the two wires down through the upper ROPS to the pin-point, and ran the wiring outside the ROPS to be joined with mating bullet connectors to the original terminals.
NO-I don't reccommend people do this!
NO-I will not do it for anyone else!
NO-I'm not worried about sueing or getting sued
But Yes-it is what I personally wanted to do for MY tractor.

OK, final photos coming, and if anyone wants more info, details, photos, measurements, etc, I'd be happy to help.
One person from my FaceBook wants one built, I have quoted him $1000.00 less than he could buy a Deluxe Curtis Cab, installed, in Canadian money. Accessories would be extra.
This build took me total of 5 weeks build time, some days were longer than others, and was a great project. I figure I've added $5,000.00 in value to my tractor, and priceless comfort and satisfaction.
Cheers,
-Greg Hiltz
 

Attachments

Last edited:

gregger

New member
Lifetime Member
May 30, 2014
75
5
0
Saint John, NB Canada
Couple more photos to end this show.
Some may notice the white roof liner in the finished photos, along with the rubber foam play mats between the roof frame and panel, I also had some 3/4" thick white closed-cell foam packing sheets, from a kitchen appliance, I think. It worked great between the roof cross-members, and the little dots you see are interior lights, bullet LED clearance lights, I just punched 3/4" holes through the foam and pulled them in place with the wiring above it.
 

Attachments

Last edited:

gregger

New member
Lifetime Member
May 30, 2014
75
5
0
Saint John, NB Canada
Awww, just to mention - the Winter Front air dam around the lower center console- I figured Curtis would want a wicked price, so my wife had a couple yards of brown vinyl left over from re-upholstering some chairs, so I simply took a pattern from the curved piece, extended it as needed to fold and stitch, plus allow for overhang at bottom and sides. With her help of course, we folded the brown vinyl over along my marks, and ran a triple row of stitching around it. I bought couple packages of peel & stick Velcro, washed the center panel down with rubbing alcohol, and stuck the Velcro around the outer edges, and stuck the mating Velcro to the vinyl. I peeled it off carefully, and tried to use my wife's Singer to stitch the Velcro, but it was having NONE of that crap, just balled up the thread twice. So I took it to a local Sail-Maker (Yes they still do exist in this Port City), who did me a double row of stitching through the Velcro and vinyl. - Great thing too, they just chuckled and didn't charge me a thing. -I owe him a large coffee!
BTW,
I ran the first snowstorm with the air dams (Black plastic halfs inside the Center Console cover) both intact, just put the Winterfront on. I watched the temp gauge, and ran the engine approx. 2000rpm during snowblowing for almost an hour, the gauge rose to 3/4 in the normal range, close to 1/4" from the red mark. I brought the tractor back to my garage, and removed the right side half of the black plastic air dam, letting the engine get air from beneath the tractor. I ran it again, and for the next hour, plus the next storm last week, the gauge rose no higher than mid range on the temp gauge. I will leave the other half bolted in place, and come the spring, may or may not need to remove it, or simply peel off the vinyl winterfront.

I garnered the info regarding the winterfront and the factory air dams from the Curtis Cab Installation manual, which can be downloaded from their site.
Photos following of me making up the WinterFront
 

Attachments

gregger

New member
Lifetime Member
May 30, 2014
75
5
0
Saint John, NB Canada
That is fantastic !!!

Couple of questions.....
Excluding labor - what cha got in it? (convert to US if possible)

Love to see more pictures - rear, front , hood area - so on.

You had to have a hellva lot of "well, if I do this, then I need to do this first" thoughts......

really nice job!
Keep scrolling down, you caught this as I was just getting started LOL
-Greg
 

gregger

New member
Lifetime Member
May 30, 2014
75
5
0
Saint John, NB Canada
Im making mine the same way. 1" square tubing with 18ga skin. Looks like the same door latch too. Just built my door Friday, and lift-off hinges shipped today. Im going with laminated glass for windshield and safety glass everywhere else. Hope mine turns out as nice as yours!
Make sure you take lots of photos. - What were the Hinges costing you?
-Greg
 

Grouse Feathers

New member
Lifetime Member

Equipment
BX2370, FEL, Snowblower-BX5455, Homebuilt Forks, LP RB1560, LP GS1548
Feb 16, 2015
1,022
4
0
Lovells, Mi
BTW,
I ran the first snowstorm with the air dams (Black plastic halfs inside the Center Console cover) both intact, just put the Winterfront on. I watched the temp gauge, and ran the engine approx. 2000rpm during snowblowing for almost an hour, the gauge rose to 3/4 in the normal range, close to 1/4" from the red mark. I brought the tractor back to my garage, and removed the right side half of the black plastic air dam, letting the engine get air from beneath the tractor. I ran it again, and for the next hour, plus the next storm last week, the gauge rose no higher than mid range on the temp gauge. I will leave the other half bolted in place, and come the spring, may or may not need to remove it, or simply peel off the vinyl winterfront.
Really great looking cab, I know it makes snow blowing a lot more comfortable.
For cooling on my BX2370 I removed the foam seals that are use to seal the openings in the black air dam and left both pieces of air dam installed. Normally my machine runs at two divisions on the temperature gauge. The only time I have gotten up to three divisions is blowing heavy wet snow. I have a 1/2 mile of driveway so with wet heavy snow I have a good long run to heat it up. On the way back the temperature dropped back to the normal two while still blowing snow, but going downhill.
 

gregger

New member
Lifetime Member
May 30, 2014
75
5
0
Saint John, NB Canada
Really great looking cab, I know it makes snow blowing a lot more comfortable.
For cooling on my BX2370 I removed the foam seals that are use to seal the openings in the black air dam and left both pieces of air dam installed. Normally my machine runs at two divisions on the temperature gauge. The only time I have gotten up to three divisions is blowing heavy wet snow. I have a 1/2 mile of driveway so with wet heavy snow I have a good long run to heat it up. On the way back the temperature dropped back to the normal two while still blowing snow, but going downhill.
Thanks for the nice comments, Larry. - I'll look again at the foam seals on the black air dams, and may re-install with those removed to try.
Cheers,
-Greg
 

skeets

Well-known member

Equipment
BX 2360 /B2601
Oct 2, 2009
14,149
2,809
113
SW Pa
2 comments,,, First that is a very well thought out cab and nicely built
Secondly,, Dude that is one hell of a play room you got there,, is that your garage or is that work shop,,;)
 

Tooljunkie

Well-known member
Lifetime Member

Equipment
L1501,home built carry all, mini plow blade.
May 13, 2014
4,150
27
48
59
Lac Du Bonnet, Manitoba,Canada
Nice fabrication. Well thought out. Many of my builds are more time thinking than working. Thats ok, planning ahead is better than cutting apart and doing over. Wish i had the time, work gets in the way.